🤤Mom’s Perfect Stuffing🍗
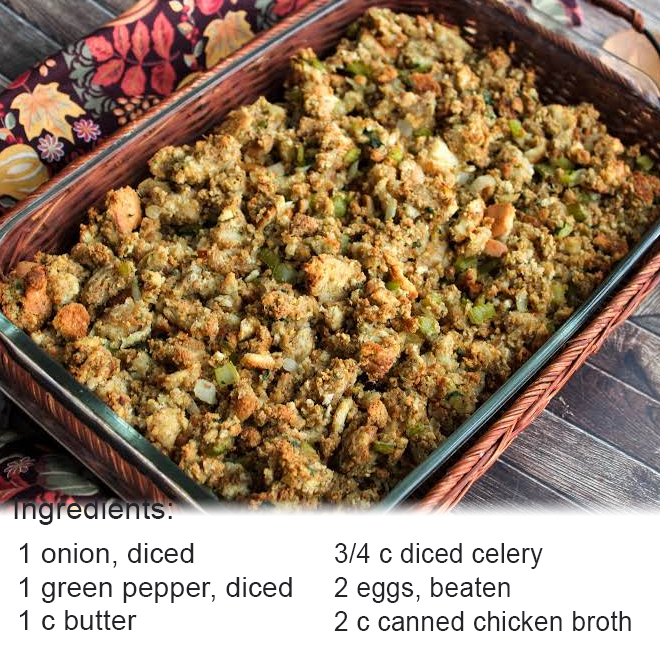
Ingredients:
- 1 onion, diced
- 1 green pepper, diced
- 1 c butter
- 3/4 c diced celery (celery seed can be used, maybe a teaspoon or so)
- 2 eggs, beaten
- 2 c canned chicken broth
- 1 bag(s) Pepperidge Farm herbed seasoned stuffing (is crumbs, not cubes or croutons and is sold in a blue & white bag), 16 oz.
- 1 bag(s) soft bread cubes, 16-20 oz.
- 1 tsp garlic powder
- 1 tsp poultry seasoning
- 2 Tbsp dried parsley flakes (or can use fresh parsley)
- 1 tsp oregano
- 1 Reynolds turkey sized baking bag
- 1 turkey
Instructions:
1In a large bowl, combine the bag of bread cubes with Pepperidge Farm herbed seasoned stuffing.

2In a frying pan, melt butter over medium-high heat. Sautée onions, green pepper, and celery (or celery seed) until all is softened and translucent.

3Pour melted butter and vegetables over all bread cubes and crumbs.

4Mix in the two beaten eggs. Toss.

5Add: 1 tsp Garlic Powder, 1 tsp Poultry Seasoning, 2 Tbsp Dried Parsley, 1 Tsp Oregano. Toss again.

6Now pour chicken broth over all of the mixture making sure that stuffing is ALMOST wet. You want it to be more than damp, but not downright wet so that stuffing doesn’t dry out while inside turkey baking. (You can judge if stuffing is becoming too wet, just reserve the rest of the broth if not needed. Many people like to use milk, but I find that it causes it to have a bland flavor. The chicken broth is the secret to excellent flavor, here.)

7Toss once again, making sure all bread is well coated with all ingredients.

8Stuff the turkey, packing tightly, but not too tightly (as in “don’t really jam it in there”) at both ends. (If you have any leftover, you can put it in a casserole dish, and refrigerate until 45 minutes before turkey is done, then put in the oven with turkey for extra stuffing.)

9Use softened butter and, using fingers, rub butter all over turkey until coated. Then shake a little paprika over the top of the entire turkey.

10Put about 2 tablespoons flour inside the baking bag before putting the turkey inside. Push turkey into the bag. Close bag tightly. Make three slits across the top of the bag for ventilation and put it into a roaster pan.

11Put the lid on the roaster. Then bake following instructions for the size turkey you have. (**Note: the baking bag will probably cut baking time by at least 3/4 hr to 1 hour, but really holds in the juices and turkey stays very moist and juicy.)
No basting is required when you use the baking bag, but if you wish, you can baste one or two times during baking.

Note:

Be sure to remember to make the slits in the top of the baking bag, maybe an inch or two long, and be sure to put the little bit of flour into the bottom of the bag before you put the turkey inside. When finished, you will have an ample supply of broth inside the bag to make your gravy. Simply use a cup or ladle to scoop it all out.
(What broth I don’t need, I always put into a plastic container and freeze to use when I make my chicken soups. I add it into the pot of soup and it gives my soups added extra special flavor!)

I don’t think the title of your article matches the content lol. Just kidding, mainly because I had some doubts after reading the article.
Your point of view caught my eye and was very interesting. Thanks. I have a question for you.
Your point of view caught my eye and was very interesting. Thanks. I have a question for you.
Nach der Registrierung können Sie einen Willkommensbonus und Freispiele auf Ihre ersten Einzahlungen beanspruchen. Spieler erwartet eine
riesige Auswahl mit über 3.000 Slots, Live Casino, Tischspielen,
Jackpots und exklusiven Neuerscheinungen von Top-Providern wie NetEnt, Play’n GO und Evolution. Neukunden bei Cadoola Casino
Österreich erhalten einen großzügigen Willkommensbonus von 500 € plus 200 Freispiele, verteilt auf die ersten Einzahlungen.
Für bestehende Kunden gibt es Reload-Boni, Cashback, Freispiele
und ein umfangreiches VIP-Programm. Der Willkommensbonus ist sehr attraktiv und Free Spins gab es gleich dazu – ein super Start für Einsteiger wie mich.
FAQ-Bereich umfasst 200+ deutsche Antworten zu häufigen Fragen über Boni, Zahlungen, Spielregeln und technische Probleme.
Unser deutschsprachiger Kundensupport operiert aus Berlin und München mit muttersprachlichen Agenten.
Push-Benachrichtigungen informieren über Bonusaktivierungen,
Turniereinladungen und Auszahlungsbestätigungen in deutscher Sprache.
Mobile Zahlungen integrieren deutsche Banking-Apps wie Sparkassen-App, Commerzbank-App und Deutsche Bank-App für nahtlose Ein- und Auszahlungen. Unsere mobile
Plattform optimiert sich automatisch für deutsche Internetgeschwindigkeiten und Mobilfunknetze.
References:
https://online-spielhallen.de/lukki-casino-mobile-app-dein-ultimativer-leitfaden/
Thanks for sharing. I read many of your blog posts, cool, your blog is very good. https://accounts.binance.info/ur/register-person?ref=SZSSS70P
Players appreciate the comprehensive responsible gambling
tools available. These independent auditors
verify game fairness and random number generation. ECOGRA
and GLI auditing receives mention in player reviews as additional security measures.
Players rate the casino’s Curacao eGaming licence positively for providing regulatory oversight.
The second deposit requires the LVL2 promo code and offers
another 100% bonus up to $2,000 plus 75 additional
free spins. New Player Welcome Package Level Up Casino’s welcome bonus spans across your
first four deposits, totalling up to $8,000 plus 350 free
spins. The platform offers structured welcome bonuses with
free spins and regular cashback opportunities for
existing members. The responsive design ensures smooth gameplay whether using the
downloadable Level Up Casino mobile app or browser-based instant play option. The Level Up Casino mobile
app is available for both Android and iOS devices, offering seamless
access to the complete gaming library.
ECOGRA and GLI auditing provides independent verification of
our gaming systems and random number generators. We implement SSL
encryption technology across all transactions and
data exchanges to protect player information. Company with legitimate Curaçao eGaming licensing, ensuring
regulatory compliance and secure gaming operations.
Game return-to-player (RTP) percentages are publicly displayed for all titles, ensuring transparency in expected returns.
References:
https://blackcoin.co/45_exclusive-new-jersey-online-poker-vip-programs-compared_rewrite_1/
us poker sites that accept paypal
References:
chunboo.com
online real casino paypal
References:
https://swav.sa/employer/paypal-casinos-2025-best-paypal-slot-sites-in-the-uk/
I like the valuable information you provide in your articles.
I’ll bookmark your blog and check again here frequently.
I’m quite sure I’ll learn many new stuff right here!
Good luck for the next!
Thank you for your sharing. I am worried that I lack creative ideas. It is your article that makes me full of hope. Thank you. But, I have a question, can you help me?
Its like you read my mind! You appear to know so much
about this, like you wrote the book in it or something. I think that you could do with some pics to drive the message home a little bit,
but other than that, this is great blog. A fantastic
read. I’ll certainly be back.
Thanks for sharing. I read many of your blog posts, cool, your blog is very good. https://www.binance.bh/futures/ref?code=JW3W4Y3A
Grand League selection in matches where teams have rested players coming back from injury layoffs.
Have you ever thought about publishing an e-book or guest authoring on other blogs?
I have a blog centered on the same subjects you discuss and would
love to have you share some stories/information. I know my
subscribers would enjoy your work. If you are even remotely interested, feel
free to shoot me an email.